Rithm’s Auto-Scheduler (the “Okay – make my day!” experience) normally builds a visit plan from your full set of eligible clients. You do not have to limit that pool every time.
Sometimes you will want to narrow it. You may have more clients than time, be traveling in one area, be focusing on a stage of the sales cycle, or want only your highest-priority accounts on the calendar. Selecting clients to optimize means telling Auto-Scheduler which clients are allowed into that run—using an importance range, optional filters, or both—before it builds your schedule.
Two controls work together:
- Client importance — a 1–10 range. Only clients whose importance falls inside that range are considered (with a few special cases noted below).
- Client filters — optional rules such as stage, type, city, state, zip, country, note, or a custom field. When a filter is set, a client must also match that rule.
Appointments you already entered yourself stay on the calendar. Auto-Scheduler fills openings around your existing plans; it does not replace your manual meetings.
Where to find it (Web)
Open Auto-Scheduler from the main menu. That page is where you choose who to include before starting a run.
You will see:
- The heading Ready to Auto-Schedule with AI?
- The primary button Okay – make my day!
- Below that button, a panel with:
- A live count such as Auto-Schedule {N} clients (and sometimes an averaging note such as Averaging {N} per day)
- The Client importance dual slider
- Create schedule only for these clients (the filter controls)
Note: From the Schedule (calendar) page you can also start Auto-Schedule. That shortcut uses a broad default and does not show the importance slider or filters. To choose clients deliberately, use the Settings option in that dialog (or open Auto-Scheduler from the menu) so you land on the full selection page.
How to use it (Web)
Step 1: Decide whether you need to narrow the pool
Leave the defaults if you want Auto-Scheduler to consider your usual eligible clients.
Narrow the pool when you want to:
- Visit only the most important accounts
- Spend time with mid-priority clients who need attention
- Focus on one city, region, stage, or type
- Keep the day’s plan lighter by reducing how many clients compete for slots
Step 2: Set the client importance range

Under Client importance, use the dual slider (values from 1 to 10).
- The left handle is the minimum importance included.
- The right handle is the maximum importance included.
- Tip on the page: Click between the handles to move the minimum and keep the maximum.
How importance works on each client
- Each client has an importance from 1 (lowest) to 10 (highest).
- New clients typically start at 5 (medium).
- Clients marked Do not visit (importance 0) are never scheduled, regardless of the slider.
Typical defaults
For many accounts, Auto-Scheduler starts with about 5 to 10—medium through highest importance. Your last choice is remembered for next time.
Useful range examples
| Goal | Example range | Effect |
|---|---|---|
| Only top accounts | 9–10 | Fewest, highest-priority clients |
| Strong focus, still a bit of breadth | 7–10 | High-importance clients |
| Mid-tier accounts that need help | 5–7 | Medium importance; skips the very top and the lowest |
| Almost everyone eligible | 1–10 | Widest pool (still excludes “Do not visit”) |
Narrowing the range is one of the simplest ways to leave more time per visit and avoid an overcrowded plan.
As you move the slider, the line Auto-Schedule {N} clients updates for the importance range. It may also show how that load averages per day over your scheduling horizon. That count is based on importance; if you add a filter next, the final matching set can be smaller.
Step 3: Optionally add a client filter

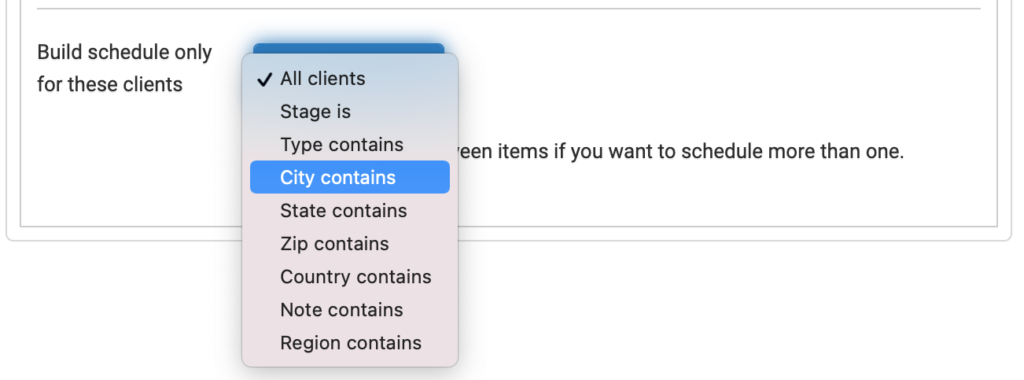
Under Create schedule only for these clients, open the dropdown.
| Option | What it does |
|---|---|
| All clients | No extra filter—importance alone decides the pool |
| Stage is | Choose a sales stage (for example Aware, Trial, User) |
| Type contains | Limit by client type using the type checkboxes |
| City contains | Match text in the client’s city |
| State contains | Match text in the state |
| Zip contains | Match text in the zip/postal code |
| Country contains | Match text in the country |
| Note contains | Match text in the client note |
| {Custom field} contains | Match a custom field you defined (for example Region contains). Each custom field appears as its own option. Hidden system fields are not listed. |
If you leave All clients selected, skip to Step 5.
Step 4: Enter what must match

After you pick a category:
- Stage is — choose the stage from the stage list.
- Type contains — use All or check the specific types you want.
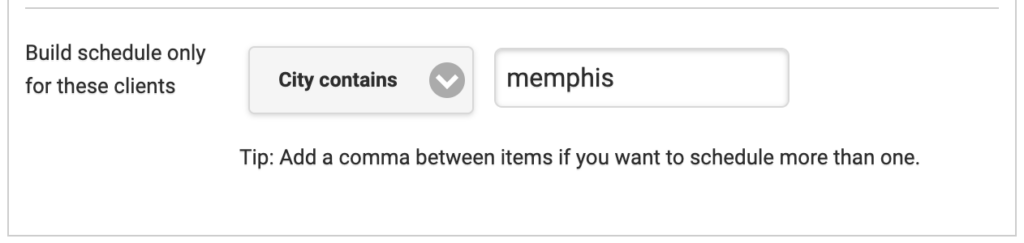
- City, State, Zip, Country, Note, or a custom field — type the text in Search for this.
Matching rules (important)
- Matching is a contains match: the client field must include your text, not necessarily equal it exactly.
- Matching is not case-sensitive:
memphisandMemphisare treated the same. - Spelling matters: a misspelled city on the client record (or in your search) will not match.
- Empty fields do not match a filter. If you filter by City and a client has no city, that client is left out.
- For text filters, use a tip on the page: Add a comma between items if you want to schedule more than one.
Comma examples
Memphis— only clients whose city contains “Memphis”Memphis,Arlington— clients whose city contains “Memphis” or “Arlington”- You can list as many comma-separated items as you need
Spaces after commas are fine in everyday use; keep each city, zip, or keyword clear so you can read the rule later.
Step 5: Start Auto-Schedule
Press Okay – make my day!
You will briefly see Optimizing schedule… while Rithm checks location and applies your selection.
Step 6: Respond if Rithm asks you to confirm
Before building the plan, Rithm checks how many clients actually match.
No matching clients
You may see an Error that no clients match your filter and importance range. Optimization is canceled. Adjust the importance range, fix the filter text, or choose All clients, then try again.
Very few matching clients
If only a small number match (and that is a small share of your overall clients), you may see a Warning that the schedule will be light, asking whether you are sure you want to create a schedule for only that many clients.
- Choose No to return and change your selection.
- Choose Yes to continue with that smaller set.
This is intentional: it prevents accidentally building a thin week because of a typo (for example filtering City to “Memphs”) or an overly tight importance band.
Step 7: Review the result
When the run finishes, open your Schedule to see the new recommendations. You can run Auto-Scheduler again later with different importance or filters whenever your focus changes—for example one trip for a metro area, another for strategic accounts only.
Web tips for salespeople
- Importance first, filter second. Start with the slider, then add a city or stage filter if you still need a tighter set.
- Use filters for geography and focus, not for one-off exceptions. To permanently keep someone off the road plan, set that client to Do not visit on the client record instead of trying to exclude them with a filter every time.
- Custom fields are powerful. If your team tracks Region, Segment, or similar in a custom field, filter on that field the same way you would filter City.
- Calendar shortcut vs full page. Use the full Auto-Scheduler page whenever you care about who is included. The calendar Auto-Schedule button is for a quick rerun with defaults.
- Your last importance settings are saved so the next visit to Auto-Scheduler starts close to how you left it.
Where to find it (iOS)
On the iPhone or iPad app, open the Auto-Scheduler tab in the main tab bar (sparkles / lasso-style icon). Tab order is typically: Clients, Targets, Schedule, Auto-Scheduler, Settings.
You can also reach this tab from related empty states, for example:
- From an empty schedule hint that points you to Auto-Schedule / Auto-Scheduler
- From a client meetings screen via Auto-schedule…
On the Auto-Scheduler screen you will see:
- Ready to optimize your Schedule with AI? and a short overview of what Auto-Scheduler does
- The primary button Okay – make my day!
- Below that, the selection controls:
- Auto-Scheduling {N} clients
- Client importance (dual-thumb slider from 1 to 10)
- A section titled Build schedule only for these clients with the filter menu
How this differs from the web
| Topic | Web | Mobile (iOS) |
|---|---|---|
| Where it lives | Auto-Scheduler in the main menu | Auto-Scheduler tab |
| Filter section title | Create schedule only for these clients | Build schedule only for these clients |
| Custom fields | Each custom field is its own dropdown option (for example Region contains) | Choose Custom fields, then pick the field name, then enter search text |
| Importance tip | Tip about clicking between slider handles | Dual thumbs on a native-style slider; drag either thumb |
| Search placeholders | Often Search for this | More specific hints such as Search for city, Search for zip, Search for text in note |
| Starting from the calendar | Calendar can offer Auto-Schedule with a Settings path to the full page | Use the Auto-Scheduler tab (or Auto-schedule… links that switch to that tab) |
| Advanced Auto-Scheduler settings | Native web settings pages | Available under Settings → Maintenance as web pages inside the app (not part of the on-tab filter UI) |
How to use it (iOS)
Step 1: Open Auto-Scheduler and review the defaults
If you are logged in and have clients, the Okay – make my day! button is enabled. If you are logged out or have no clients, the button stays disabled until those are fixed.
You do not have to change anything if you want a normal full run. Use the controls below when you need a focused plan.
Step 2: Set the client importance range
In the Client importance area, drag the two thumbs on the slider.
- Values run from 1 (lowest) to 10 (highest).
- Everything between the thumbs (inclusive) can be included.
- Your chosen range is saved with your optimizer preferences when you start a run.
How importance works on each client
- Edit a client’s importance on the client’s add/edit screen (also 1–10; new clients often default to 5).
- Lower the range (for example 8–10) when you only want priority accounts.
- Use a mid band (for example 5–7) when you want to work accounts that still need nurturing.
- Widen toward 1–10 when you want the broadest eligible set.
Clients that should never be visited should be marked appropriately on the client record so they stay out of planning regardless of the slider.
Step 3: Optionally choose a filter
In Build schedule only for these clients, open the menu. Options include:
- All clients
- Stage is
- Type contains
- City contains
- State contains
- Zip contains
- Country contains
- Note contains
- Custom fields (only if your account has custom fields defined)
Stage is — a second control appears so you can pick a stage such as Unaware, Aware, Trial, User, Advocate, or Lost User.
Type contains — choose ALL or tap individual types (checkmark style) so only those types are included.
City / State / Zip / Country / Note — a text field appears with a placeholder such as Search for city. Enter the text that must appear in that field.
Custom fields — pick Custom fields, choose which field (for example Region), then enter the match text in Search for this.
Leaving All clients selected means only the importance range limits the pool.
Mobile tip: When you return to this screen, the filter menu often resets to All clients. Re-select your filter if you need the same focus again. Your importance thumbs are restored from saved preferences separately.
Step 4: Use comma lists when you need more than one match
Under text filters you will see: Tip: Add a comma between items if you want to schedule more than one.
Examples:
Dallas— city contains DallasDallas,Fort Worth— city contains Dallas or Fort Worth- The same pattern works for state, zip, country, note, and custom field text
Matching is a contains style match and is not case-sensitive. Spelling on the client record must line up with what you type.
Step 5: Tap Okay – make my day!
Rithm shows Optimizing schedule… and runs a quick check of how many clients match your importance range and filter.
Step 6: Read any Warning or Error sheet
Error (no matches)
If nobody matches, you get an Error sheet explaining that there are no clients for your criteria and importance range. Optimization is cancelled. Tap Okay, loosen the range or filter, and try again.
Warning (very few matches)
If only a small number of clients match (and that is a small percentage of your total clients), you get a Warning that the schedule will be light, asking if you are sure you want to build a schedule for only those clients.
- No — dismiss and adjust your selection
- Yes — continue with that smaller set
These sheets appear as medium-height cards over the Auto-Scheduler screen—the mobile equivalent of the web confirmation step.
Step 7: Wait for results, then open your schedule
While work continues you may see progress such as Optimizing Schedule. {N} % complete. When finished, you are taken to Auto-Scheduler results. From a successful result, Okay takes you to the updated Schedule.
You can run Auto-Scheduler again anytime with a different importance band or filter—for example one run for a metro area, another for a single stage or custom region.
Mobile tips for salespeople
- Same idea as web, different layout. Importance + optional filter still define the pool; only the controls and navigation differ.
- Custom fields take two taps. On web each custom field is listed directly; on iOS choose Custom fields, then the field name, then the search text.
- Use Stage and Type for pipeline focus; use City/State/Zip/Country for territory days. Combine either with a tight importance range when time is limited.
- If the Warning surprises you, check for typos in the search field and confirm client addresses, stages, and types are filled in consistently on the Clients tab.
- Settings that change how far ahead Auto-Scheduler plans (days in advance, meetings per day, default meeting length) live under Settings → Maintenance → Auto-Scheduler Settings, not inside the filter box. Those settings change the shape of the calendar, not which client categories you selected for this run.
Quick examples
“I only have time for my best accounts this week.”
Set importance to about 8–10 (or 9–10), leave filters on All clients, then run Okay – make my day!
“I’m spending two days in Memphis.”
Keep a sensible importance range, set the filter to City contains with Memphis (or Memphis,Arlington for nearby cities), then run Auto-Scheduler.
“I want to work mid-stage opportunities.”
Choose Stage is and the stage you care about (for example Trial), optionally narrow importance, then run.
“My team uses a Region custom field.”
On web, choose Region contains (or whatever your field is named) and enter the region text. On iOS, choose Custom fields, select Region, enter the same text. Use commas if you need more than one region value.
“The Warning said only a few clients matched.”
That usually means the filter or importance band is tighter than you expected. Widen the slider, switch back to All clients, or fix spelling—then run again. Or choose Yes if you truly wanted that small, focused set.