As an outside sales professional, keeping track of numerous clients and their availability can feel overwhelming. Quotas change, territories shift, and manually planning every day can take time away from selling.
That’s where Rithm’s Auto-Scheduler comes in. It helps you keep track of client meetings and suggests who should be seen on each day of your upcoming schedule. It considers each client’s availability, importance, location, travel time, how long it’s been since your last visit, and more—then automatically builds a plan that puts you in front of the best clients possible so you can focus on what you do best: selling.
The Auto-Scheduler fills gaps around appointments you’ve already entered yourself. It will not move or overwrite those manual appointments. When you run it again, it only rearranges its own earlier suggestions to fit your latest plans.
What it does for you
- Personalized recommendations — Analyzes your client data to suggest strong visit schedules.
- Respects your plans — Manual appointments stay intact while AI fills the open time.
- Adaptive scheduling — Rerun anytime to adjust for location or schedule changes.
- Continuous learning — Check off completed meetings so future runs get smarter.
Before you rely on Auto-Scheduler every day, make sure you have clients with valid addresses, realistic visit frequency, and importance rankings that reflect who matters most. Also set your work hours so meetings are only placed when you’re available.

Where to find it (Web)
You can open Auto-Scheduler from several places in the web app:
- Main menu → Auto-Scheduler
This is the full setup screen: importance range, client filters, and the Okay – make my day! button. - Schedule (Calendar)
On a day view you’ll often see:
- Auto-Schedule — quickly rebuild or refresh Rithm’s suggestions for your plan.
- Clear Schedule — clear Rithm’s suggestions for that day only (manual appointments stay).
- Settings → Maintenance → Auto-Scheduler settings
Advanced options such as how many days ahead to plan, meeting limits per day, and default meeting length for new/imported clients. - Client detail (when there are no meetings yet)
You may see an Auto-Schedule… button that takes you into the Auto-Scheduler flow. - Previous optimization status
After a run (or while one is in progress), you can return to Auto-Scheduler status to see progress or results, then open your Calendar.
Note: Full Auto-Scheduler access is part of the Professional plan. If you’re on a free/limited plan, you’ll see upgrade messaging instead of the full tools.
Also: if you’re viewing someone else’s filtered account, Auto-Scheduler may ask you to switch back to your own account first (Use my account) before it will build your plan.
How to use it (Web)
Step 1: Prepare your foundations
For the best first run:
- Add clients (or import them) with usable street addresses.
- Set each client’s Importance (1–10).
- Confirm visit frequency and, where needed, client hours.
- Set your own work hours in Settings.
- Put any fixed appointments (calls, lunches, personal holds, customer-requested times) on the Schedule yourself first. Auto-Scheduler will schedule around them.
Optional but powerful client flags:
- By Appointment Only — Auto-Scheduler will not create meetings for that client (unless you’ve marked them to visit ASAP).
- Visit ASAP — Forces that client into consideration on the next run so they can be added to the near-term route, even when they might otherwise be filtered out.
Step 2: Open Auto-Scheduler and review the setup screen
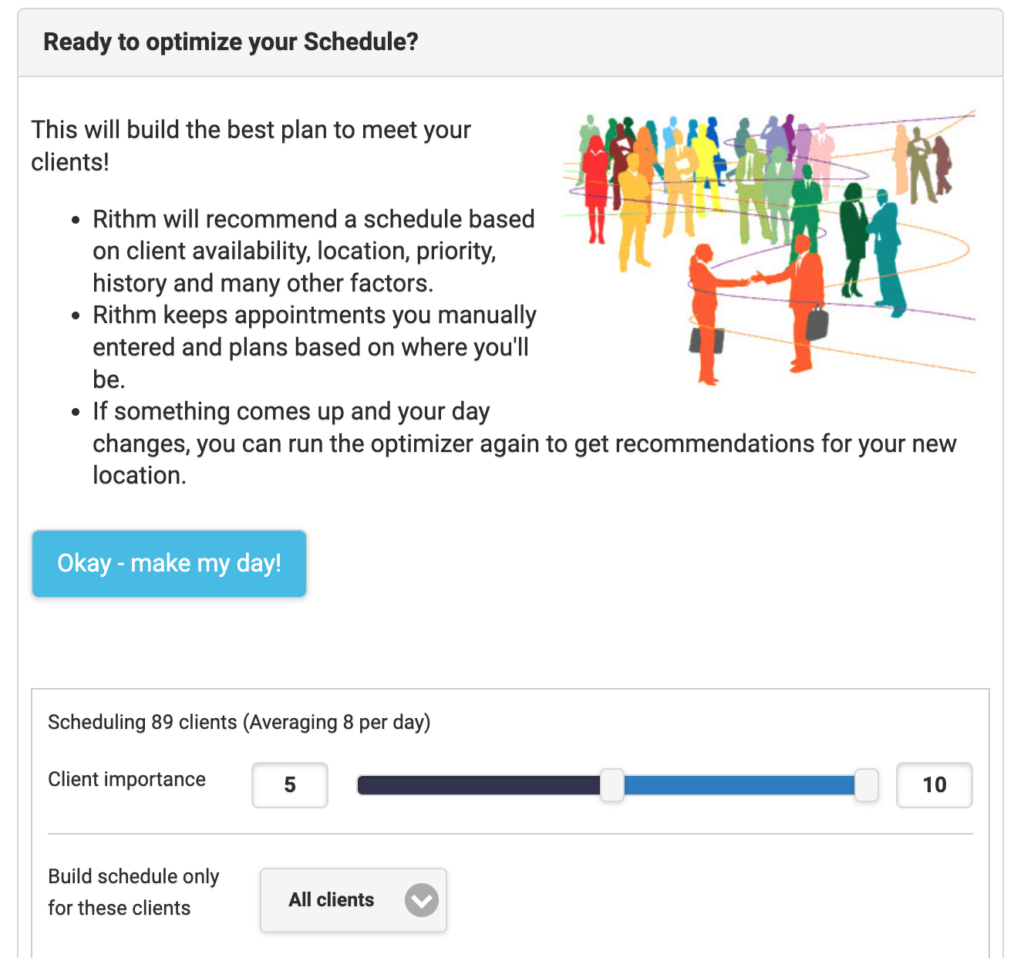
Go to Auto-Scheduler in the main menu. You’ll see the intro (“Ready to Auto-Schedule with AI?”) and the primary action Okay – make my day!
If you don’t have clients yet, Rithm will prompt you to add some before you can build a schedule.
Step 3: Choose client importance
Under Client importance, use the dual-handle slider (range 1–10) to choose which clients are eligible for this run.
- Only clients whose importance falls between the low and high handles are considered.
- The live count updates as you move the handles—for example, Auto-Schedule {count} clients with an estimate of how many visits that may average per day.
- Tip shown in the UI: click between the handles to move the minimum while keeping the maximum.
How to set importance for individual clients
- On a client’s add/edit or detail screen, use the Importance control (1 = Not Important, 10 = Very Important; new clients often default to 5).
- Or use Target List, where clients are grouped by importance (for example, Importance 10 / Very Important down through lower ranks). You can move clients between levels there.
How importance affects planning
- Higher importance clients are preferred when time is limited.
- Clients marked importance 0 are treated as “do not visit” and are not auto-scheduled.
- After a run, clients outside the importance range you used may appear grayed on the schedule so you can see who was intentionally left out of that plan.
Step 4: Filter which clients to include (optional)
Under Create schedule only for these clients, choose how narrowly to build the plan:
- All clients (default)
- Stage is
- Type contains
- City contains
- State contains
- Zip contains
- Country contains
- Note contains
- Custom fields, shown as {Field name} contains when your account has them
For text-based filters, use the search field (Search for this). Tip: add a comma between items if you want to match more than one value. For Type contains, you can toggle specific types or All.
Filters are useful when you want a focused week—for example, only one city, one stage, or one client type—without changing everyone’s importance.
Step 5: Run Auto-Scheduler
- Tap Okay – make my day!
- Allow location if prompted (Rithm may use your current position, especially when you’re already out in the field).
- You’ll see progress such as Optimizing schedule… and then Auto-Scheduler status.
- Status refreshes while the job runs. Messages may include that the Auto-Scheduler is starting, that your schedule is being optimized, or that it can take a few minutes. You can leave the status screen; the job continues in the background.
- When finished, you’ll see Your new schedule is ready! with how many clients were successfully scheduled. Open Calendar to review the plan.
Light-schedule warning
If your filters leave only a very small set of clients (for example, a handful of matches that are a small share of your whole book), Rithm may warn that the schedule will be light and ask whether to continue (No / Yes).
No matches
If nothing matches your importance range and filter, optimization is canceled with a clear explanation so you can widen the range or change the filter.
Step 6: Quick reruns from the Schedule
From Schedule:
- Click Auto-Schedule.
- Confirm in the dialog: Ready to adjust the schedule?
Rithm explains that recommendations will be added and gaps filled where there’s room, and that appointments you entered stay as-is. - Choose:
- OK — run with your current settings
- Settings — jump to the full Auto-Scheduler setup (importance + filters)
- Cancel
While a run is busy, the button may show Auto-Scheduling…
Step 7: Clear Schedule (web Schedule day view)
Use Clear Schedule when you want a clean slate for Rithm’s suggestions on that day:
- Click Clear Schedule.
- Confirm: Ready to clear the schedule?
This moves Rithm’s recommendations off that day (they can be placed on other dates as the plan rebuilds). Your manually entered appointments remain untouched. - Choose OK or Cancel.
Step 8: Tune Auto-Scheduler settings (optional)
Open Settings → Maintenance → Auto-Scheduler settings:
| Setting | What it controls |
|---|---|
| Days in advance to schedule | How far into the future Auto-Scheduler forecasts (for example, a few days up through multiple weeks). |
| Limit meetings per day | Cap suggested + preset meetings per day, or choose Not limited. Even when unlimited, Rithm still respects work hours, client hours, and travel time. |
| Default minutes per meeting | Default visit length for new and imported clients only. It does not overwrite existing clients—use bulk edit for that. |
Save when finished.
Understanding the results (Web)
On the status / results screen
Typical success messaging:
- Done
- Your new schedule is ready!
- Successfully scheduled {number} clients.
- Encouragement such as Wow, that was easy! (or a softer message if nothing could be placed)
If some clients could not be placed, you may see Improvements are possible with guidance to check addresses, travel distance, and overlapping work hours. Expand the details to see buckets such as:
- Not available
- Too far away
- High priority
- Low priority
Helpful next steps may include Fix addresses, Analyze, or scheduling an overnight stay near distant clients and running Auto-Scheduler again so far-away accounts can fit that day.
On the Calendar
Suggestions appear as normal timed meetings on each day, along with travel and helpful day notes. Examples of notes you may see:
- The plan for this day hasn’t been created yet — use Auto-Scheduler.
- This schedule has been edited — Auto-Schedule again to refill gaps.
- The schedule is light — add nearby prospects, then Auto-Schedule.
- Already seen some of these clients? Mark them completed to teach Rithm, then Auto-Schedule.
Important behaviors to remember
- Your manual appointments stay. Auto-Scheduler only replaces its own prior suggestions.
- Editing an auto-suggested meeting’s time can turn it into a fixed appointment so future runs treat it like something you entered on purpose.
- Mark meetings completed with the checkmark/completed control as you finish them. That teaches Rithm who you’ve actually seen and improves the next run.
- If you add new manual appointments that overlap earlier suggestions, just Auto-Schedule again. Rithm will reshuffle its suggestions around your new commitments.
- Clients outside your last importance filter may appear grayed so you can see who was left out of that optimization.
Where to find it (Mobile)
On iPhone / iPad, Auto-Scheduler is a main tab:
Clients → Targets → Schedule → Auto-Scheduler → Settings
Open the Auto-Scheduler tab (sparkles icon) to see the intro, importance controls, filters, and Okay – make my day!
Other helpful entry points:
- Client meetings empty state — Auto-schedule… switches you to the Auto-Scheduler tab.
- Schedule empty weekday (within the forecast window) — tips may say to go to the Auto-Scheduler / Auto-Schedule tab to create a plan.
- Settings → Maintenance → Auto-Scheduler Settings — opens the Auto-Scheduler settings page (web settings embedded in the app) for days-ahead planning, meeting limits, and related options.
- Settings → Default work hours — auto-scheduled meetings are only arranged during the hours you set here.
- Previous optimization status — after you’ve run Auto-Scheduler at least once, this button on the Auto-Scheduler tab reopens the last results.
Difference from web: Mobile does not show separate Auto-Schedule / Clear Schedule buttons on the Schedule day the same way the web calendar does. On mobile, you primarily run and rerun from the Auto-Scheduler tab. Schedule tips still guide you back there when a day needs a new plan.
How to use it (Mobile)
Step 1: Prepare your foundations
- Sign in (Auto-Scheduler is disabled when you’re logged out or have zero clients).
- Add clients with valid addresses.
- Set Default work hours under Settings.
- Set each client’s Importance.
- Enter any fixed appointments on Schedule first so Auto-Scheduler can fill around them.
Client rules that also apply on mobile (managed on the client record, including via the web if you use both):
- By Appointment Only — skipped by Auto-Scheduler unless marked to visit ASAP.
- Visit ASAP — prioritizes that client into the near-term route on the next run.
Step 2: Open the Auto-Scheduler tab
You’ll see:
- Ready to optimize your Schedule with AI?
- Supporting line about creating the best plan with AI-powered scheduling
- Feature reminders: personalized recommendations, respects your plans, adaptive scheduling, continuous learning
- Primary button: Okay – make my day!
Step 3: Choose client importance
Under Client importance, drag the dual-thumb slider between 1 and 10.
- Only clients inside that range are considered for the run.
- The header updates to Auto-Scheduling N clients (it warns visually if N is 0).
- Your chosen range is remembered for the next time you open Auto-Scheduler.
How to set importance on mobile
- Targets tab — clients are grouped by importance; change a client’s rank quickly from the row controls.
- New / Edit client — Importance slider (1–10).
- Client detail — shows Importance rank.
Common labels you may see for ranks include Very Important (10), Important (9), Average (5), Below Average (4), and Not Important (1).
Higher importance clients are preferred when the day fills up. After a run, clients below the low end of the range you just used may appear grayed in Clients and Schedule lists.
Step 4: Filter which clients to include (optional)
Under Build schedule only for these clients (picker accessibility label: Create schedule only for these clients), choose:
- All clients
- Stage is (then pick a stage such as Unaware, Aware, Trial, User, Advocate, Lost User)
- Type contains (toggle ALL or specific types)
- City contains / State contains / Zip contains / Country contains / Note contains
- Custom fields (when your account has them), with Search for this
For text filters, use the search hints (for example, Search for city). Tip: add a comma between items if you want to schedule more than one match.
Difference from web: The section title on mobile is Build schedule only for these clients; on web it’s Create schedule only for these clients. The filter choices themselves are the same idea.
Step 5: Run Auto-Scheduler
- Tap Okay – make my day!
- You’ll see Optimizing schedule… and progress such as Optimizing Schedule. N % complete.
- While running, the main button area shows that your schedule is being optimized and that it can take a few minutes.
- Rithm first checks how many clients match your settings:
- 0 matches → Error sheet explaining that no clients matched; optimization is cancelled (Okay).
- A very small matching set → Warning that the schedule will be light; choose No or Yes.
- Otherwise → optimization starts right away.
- When finished, you’re taken to Auto-Scheduler results.
Allow location access when possible. Mobile prefers your current GPS for the run and falls back to your home location if needed.
Step 6: Review results and open Schedule
On Auto-Scheduler results:
- Banner: Building the best schedule to meet clients
- If clients were placed: Your new schedule is ready! plus Successfully scheduled N clients. Wow, that was easy! and Press Okay to see the updated schedule.
- Tap Okay to jump to the Schedule tab for today with a refreshed plan.
- Use ‹ Auto-Scheduler in the navigation bar if you want to go back without that jump.
Step 7: Optional settings in the app
- Settings → Default work hours — required context for when meetings may be placed.
- Settings → Maintenance → Auto-Scheduler Settings — opens the same Auto-Scheduler settings used on web (days in advance, meeting limits, default minutes for new/imported clients).
Difference from web: Those advanced settings are not a fully native mobile form; they open as an embedded web settings page inside the app.
Understanding the results (Mobile)
Success vs “Improvements are possible”
If some (or all) clients could not be placed, results show:
- Improvements are possible.
- An explanation that Rithm could not find a schedule for N clients—check that addresses are valid, clients are close enough to drive to, and work hours overlap with yours.
- Learn more — opens a detailed list.
Learn more (unscheduled clients)
Here you’ll see your work hours and sections such as:
- Could not schedule N clients that are not available
- Could not schedule N clients that are too far away
- Could not schedule N clients with high priority
- Could not schedule N clients with low priority
Rows may include distance from home. If addresses look unclear, use Address Checker or Analyze (these open helper tools in an embedded browser). Closing tips may suggest reducing how many clients you’re trying to force into the window, adjusting visit frequency, raising importance for key accounts, or expanding work hours—then running Auto-Scheduler again.
Difference from web: On mobile, these “Learn more” lists are shown as open sections. On web, similar details are often presented in collapsible/disclosure groups on the status page.
On the Schedule tab
Suggested visits appear as regular schedule meetings (not a separate “suggestion tray”). Day notes may tell you:
- There aren’t enough clients for that date — find prospects, then Auto-Schedule.
- The day was edited — use Auto-Schedule to adjust.
- A future day hasn’t been forecast yet — use Auto-Schedule when you’re closer.
- Mark completed meetings to teach Rithm, then Auto-Schedule for a fresh plan.
Habits that make every run better
- Tap Okay – make my day! whenever your day changes—new fixed appointments, travel changes, or completed visits.
- Mark meetings completed as you finish them so the next run knows who you’ve already seen.
- Remember: Auto-Scheduler rearranges its own suggestions; appointments you entered manually stay put.
- If a day looks wrong after edits, return to the Auto-Scheduler tab and run again rather than rebuilding the whole day by hand.
Difference from web: There is no dedicated Clear Schedule button on the mobile Schedule day. To reshape a day, adjust your fixed appointments as needed, then rerun Auto-Scheduler from the Auto-Scheduler tab so suggestions refill around what you kept.
Tips for getting great schedules
- Start with accurate addresses and realistic travel expectations.
- Rank your true A-clients higher so scarce time goes to them first.
- Put immovable appointments on the calendar yourself before you run Auto-Scheduler.
- Mark completed visits consistently—each checkmark improves the next plan.
- If suggestions overlap something you just added, simply run Auto-Scheduler again; it will move its own recommendations to fit.
- For distant clusters of clients, plan an overnight near them, then Auto-Schedule so those accounts can be included on that day’s route.
- If a run says improvements are possible, open the details, fix addresses or hours, widen or narrow your importance filter as needed, and try again.
Say goodbye to the hassle of manually planning every daily appointment—and let Auto-Scheduler keep your route focused on the right clients, in the right order, at the right time.